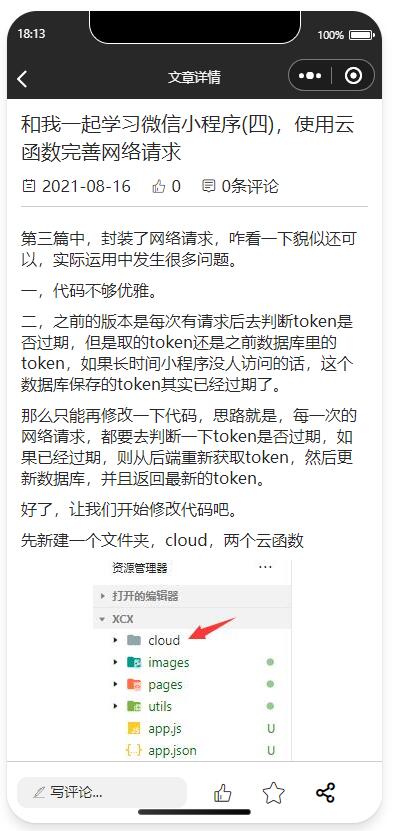
详情页是整个项目最复杂的地方,涉及到很多知识点,内容比较多,这里先说一下内容布局。
顶部是标题,下方是文章的一些基础数据,然后是正文页,通过前一篇,使用highlight实现代码高亮,最下方是互动栏,通过fix定位固定在底部的,先看一下效果图如下:

在js文件中,会定一个articlemode对象用户数据绑定,正文富媒体部分使用<rich-text>标签,之后是标签列表
  <view class="title">{{articleModel.title}}</view>
  <view class="info"><text class="iconfont icon-date"> {{articleModel.createDatetime}}</text>
    <text class="iconfont icon-dianzan2"> {{articleModel.ding}}</text><text class="iconfont icon-huitie"> {{articleModel.reply}}条评论</text>
  </view>
  <rich-text nodes="{{articleModel.content}}">
  </rich-text>
  <view class="taglist"><navigator class="tag" wx:for="{{articleModel.tags}}" wx:key="item" url="/pages/tag/tag?tag={{item}}">{{item}}</navigator></view>
对应的wxss样式如下,也是比较简单的,其中wximg和wxp是在数据读取的时候,在js文件,对富媒体中的img和p标签用正则进行了替换,否则没有办法设置rich-text里面的样式。
@import "../../vs2015.wxss";

.container {
  padding-bottom: 140rpx;
}

.container .title {
  color: var(--mainColor);
  font-size: 40rpx;
  line-height: 140%;
  padding: 20rpx 0;
}

.container .info {
  display: flex;
  padding-bottom: 20rpx;
  margin-bottom: 40rpx;
  border-bottom: solid 1px var(--secondaryColor);
}

.container .info .iconfont {
  margin-right: 40rpx;
}

.container .wximg {
  display: block;
  margin: 20rpx auto;
}

.container .wxp {
  margin: 20rpx 0;
}

.container .taglist{
  display: flex;
}
.container .taglist .tag{
  border: solid 1px #DC3545;
  border-radius: 8rpx;
  color: #DC3545;
  margin-right: 20rpx;
  padding: 4rpx 12rpx;
  font-size: 26rpx;
}
之后是下方的评论列表,reply属性是文章的评论数,通过wx-if来判断是否有评论,有的话则显示评论,没有的话则显示一个沙发快来抢的图片。
 <view wx:if="{{replys==0}}" class="shafa">
    沙发空缺中,还不快抢
  </view>
  <view wx:if="{{replys>0}}" class="replylist">
    <view class="replymodel" wx:for="{{replyList}}" wx:key="_id">
      <view class="modeltop"><text class="from">{{item.from}}</text><text>{{item.createDatetime}}</text></view>
      <text>{{item.content}}</text>
    </view>
  </view>
对应的样式如下:
.container .shafa {
  text-align: center;
  color: var(--secondaryColor);
}

.container .shafa::before {
  width: 226px;
  height: 100px;
  content: '';
  display: block;
  margin: 10rpx auto 30rpx auto;
  background-image: url(https://www.shuanghei.com/images/web/shafa.png);
  background-size: contain;
  background-repeat: no-repeat;
}

.container .replylist {
  display: flex;
  border-top: solid 4rpx #ccc;
  flex-direction: column;
  padding-top: 40rpx;
}

.container .replylist .replymodel {
  margin-bottom: 40rpx;
  font-size: 28rpx;
}

.container .replylist .replymodel .modeltop {
  display: flex;
  justify-content: space-between;
  margin-bottom: 16rpx;
}

.container .replylist .replymodel .modeltop .from {
  font-weight: bold;
}
然后就是固定在底部的互动栏了,通过属性来设置zan这个按钮的不同样式,已经点过赞则显示红色。
<view class="foot">
  <view bindtap="showDialog" class="pinglun iconfont icon-bi"> 写评论...</view>
  <view class="footright">
    <text bindtap="zan" style="color:{{zancolor}}" class="iconfont {{zanclass}}"></text>
    <text bindtap="shoucang" class="iconfont icon-shoucang"></text>
    <button open-type="share" class="iconfont icon-fenxiang"></button>
  </view>
</view>
样式如下:
.foot {
  position: fixed;
  bottom: 0;
  border-top: solid 1px var(--secondaryColor);
  width: 100%;
  background-color: #FFF;
  padding: 30rpx 0;
  display: flex;
  justify-content: space-around;
}

.foot .pinglun {
  background-color: #f1f1f1;
  border-radius: 20rpx;
  padding: 10rpx 0;
  text-indent: 30rpx;
  font-size: 28rpx;
  flex-grow: 1;
  margin-left: 20rpx;
}

.foot .footright {
  flex-grow: 1;
  display: flex;
  padding: 0 50rpx;
  justify-content: space-around;
  align-items: center;
}

.foot .footright .iconfont {
  font-size: 140%;
  flex-grow: 1;
}

.foot .footright .icon-fenxiang {
  background-color: transparent;
  width: 30rpx;
  padding: 0;
  margin: 0;
  display: inline;
  position: relative;
  left: -20rpx;

}
好了,布局页完成,接下去就是最为复杂的数据调用了。